2000+ successful projects with 1000+ satisfied clients
![]()
Your winning idea is super secure with our NDA

Nowadays everyone wants to have a website, but what do you need to create and host a website?
A server to store the file
Some HTML files (for a static website)
What if you can create a website by just using static files and host it in the cloud, sounds exciting right?
Yes, it is possible for you to create google app engine static sites. Since we are talking about static websites you don’t have to worry about not being a developer. In this post we will be describing how anyone can use a scalable server for free, using Google App Engine.
Java
Python
PHP
I will be explaining this using PHP since its pretty straightforward to work with it in Google App Engine. If you are interested in Java or Python, please let us know by your comments and we will be reaching back to you.
First of all, you need to have a good-looking static website for yourself and to get this you can download some free HTML templates or contact us.
After having the HTML files follow the following steps.
Download the SDK from the given link and choose the one which is for your operating system.
If you are using Mac Os then you don’t have to install it since it comes pre-bundled with the operating system.
but if you are using windows then you have to download and set up a python environment. To download python, please follow this link.
As this blog is not about how we can install Python if you know it please let us know through comments.
Here is the screenshot, how it looks when you are going to open it for the first time.
Click on the bottom plus ( + ) icon and you will be prompted to create a new project.

Once prompted, click and select PHP from runtime section.
After selection runtime put application ID, here in our example. I have written “hello-world” as the application identifier since every programming starts with “Hello World”.
Select the appropriate folder where you want the files to be saved. You can also change port but it is not necessary at this stage.
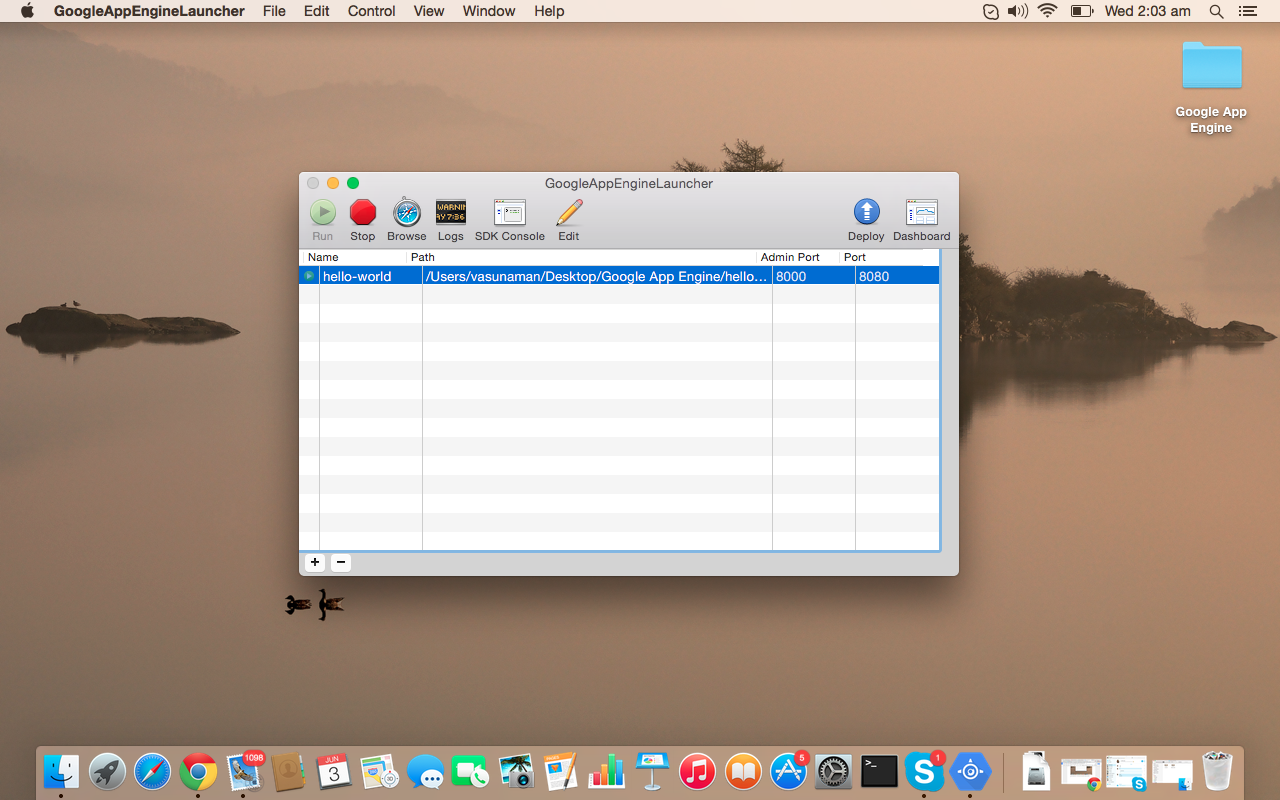
Once you enter the application identifier and select the appropriate location, click on Create. You will be end up in this screen.
Of course, if everything goes right or not just drop a comment below and we will get back to you.

Click on “Run” and when you get the “Browse” button, you will get this screen. Here is the image where you can see chrome browser. Once you click on “Browse” your default browser will open.
Once you get the screen it means you have done the basic installation of Google App Engine launcher. Now it’s time to start with your HTML template.
To show this I am downloading an HTML template from this link
Copy all the files into the hello-world folder and start editing the app.yaml file inside the folder.
To edit app.yaml file open that in any editor, in my case I am using TextEdit.
Change “script: main.php” to “script: index.html”
Basically, it makes the index.html as the main opening page and all you need to do is to add a few lines in app.yaml.
– url: /css
static_dir: css
– url: /js
static_dir: js
– url: /img
static_dir: img
and refresh the browser. You will have the static website running.
Here I am adding the complete app.yaml file after editing.
application: hello-world
version: 1
runtime: php55
api_version: 1
threadsafe: yes
handlers:
– url: /favicon\.ico
static_files: favicon.ico
upload: favicon\.ico
– url: /css
static_dir: css
– url: /js
static_dir: js
– url: /img
static_dir: img
– url: .*
script: index.html
Once this is done, it’s time to Upload.
To upload this website to Google App Engine server you need an app created in Google console.
To create an app login to Google Console.
After login create an app and then copy the Project ID and paste it to your aap.yaml file.
So now the first line will look like this
application: “Project ID”
Now just click on deploy and then you will be prompted for verification. After verifications your website will start uploading.
Now you can find the website live at “http://project-id.appspot.com” .
Here is the one that I have created.
http://staticwebsite-968.appspot.com/
In case, if you want more information on this post please feel free to contact us.
Vyrazu Labs, a global leader in the area of robust digital product development
Please fill the form below.
2000+ successful projects with 1000+ satisfied clients
![]()
Your winning idea is super secure with our NDA

For sales queries, call us at:
If you’ve got powerful skills, we’ll pay your bills. Contact our HR at:
Vyrazu Labs, a global leader in the area of robust digital product development
Please fill the form below.
2000+ successful projects with 1000+ satisfied clients
![]()
Your winning idea is super secure with our NDA
Vyrazu Labs, a global leader in the area of robust digital product development
Please fill the form below.
2000+ successful projects with 1000+ satisfied clients
Your winning idea is super secure with our NDA
For sales queries, call us at:
If you’ve got powerful skills, we’ll pay your bills. Contact our HR at: